I’ve enjoyed gardening for years. I started by visiting my local garden center each spring and carefully selecting containers of already started plants. I quickly realized that I didn’t need 6 zucchini plants – seriously, with only 2 adults I could have been a cartoon for “gifting” the excess. I also didn’t need 6 of any variety of anything, except maybe Roma tomatoes. I began purchasing single 4-inch pots which got to be very expensive so several years ago I started growing from seed indoors. This allowed me to control the number of each plant, or start, and allowed me to select from a much wider selection as there are many more varieties of seeds than are available in six packs or 4-inch pots at the nursery. Now that I am growing my own, I’m looking at saving seeds from my favorite varieties so I can grow them again each year.
Hybrid Seeds vs. Heirloom Seeds
My yard suffers from root knot nematodes, so I find it best to use VFN* resistant tomato seeds, which are a hybrid. Hybrids are not the same as a GMO or Genetically Modified Organisms. GMOs are created through genetic engineering in a lab by manipulating the DNA of an organism. Hybrids are created by cross-pollinating two different plant varieties to produce a plant with specific traits. Sadly, saving hybrid seeds is not recommended. Unlike heirlooms, which are plant varieties that have been grown and preserved through many generations of seed saving, hybrid seeds do not reproduce plants true to their parent plants. Hybrid seeds can yield inconsistent results and show a wide range of traits, often reverting to the traits of the parent plants used in the original crosspollination. Hybrids may also produce sterile seeds that won’t germinate at all. This means that saved hybrid seeds are unlikely to produce plants with the desired traits. Plants grown from saved hybrid seeds vary greatly in size, flavor, and productivity. These unpredictable outcomes can be frustrating. I’m going to try saving some seeds, just because I can, but will start some new hybrid seeds just to ensure I have a crop.
Saving Heirlooms
Saving heirloom vegetable seeds is both an art and a science, enabling gardeners to preserve the unique characteristics and flavors of their crops for generations to come. Heirloom seeds, unlike hybrid seeds, if saved correctly**, produce plants that are genetically stable and true to their parent plants, and you should get consistent production year after year.
Tips for Saving Seeds
Select the Right Plants - Choose healthy, robust plants and those that exhibit desirable traits such as disease resistance, great flavor, texture and color, and high yield. It's important to avoid saving seeds from plants that don’t seem to be thriving, or show signs of disease or pest damage, as these traits can be passed on to future generations.
Allow Plants to Fully Mature - For many vegetables (and tomatoes), seeds must be harvested only when the fruits have fully matured, which may occur up to a month later than your harvest. For example, tomatoes should be left on the plant until they are overripe, peppers should be fully red or yellow, and beans should dry thoroughly in their pods. Plants that flower such as lettuce, cilantro or basil will “bolt” and it is easiest to harvest these seeds by enclosing the seed producing tops in a fine mesh bag and allowing them to drop naturally from the plant.
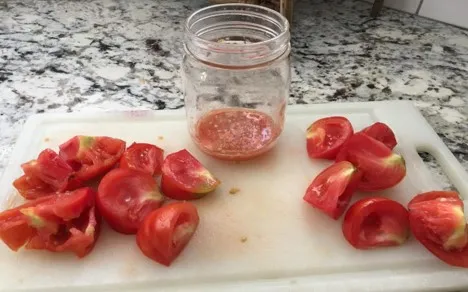
Extract and Clean - Once your produce is fully mature, the seeds can be extracted:
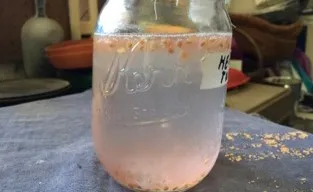
For fleshy fruits like tomatoes, squash, and cucumbers, scoop out the seeds and place them in a container of water. Allow them to ferment for at least three days; this process helps to break down the gel coating around the seeds. Don’t worry if you see a layer of mold. After fermentation, rinse the seeds with a few changes of water, then add clean water and let the seeds settle. Discard the water and the seeds that float as they probably won’t produce anyway. For other fleshy fruits, follow the directions for tomatoes, but skip the fermentation step.
For dry fruits like beans or peas, simply shell the pods and collect the seeds. You may need to separate the seeds from the debris or chaff. The easiest way I’ve seen is to put them in a shallow dish and blow gently with a hair dryer. The chaff is lighter and should blow away, leaving just the seeds.
Drying and Storing Your Seeds
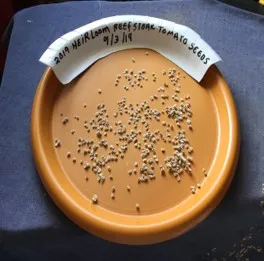
Proper drying is crucial for seed longevity. Spread seeds in a single layer on coffee filters, or a ceramic, glass or metal surface to dry. If you dry them on paper towels, know that they may stick. Set them in a well-ventilated area away from direct sunlight. Once completely dry, store seeds in a cool, dark place in airtight containers. Some gardeners use envelopes, others prefer glass jars, both are suitable options. Label each container with the seed type and date of harvest to keep track of your seed collection. The ideal storage condition is lower than 45oF and a refrigerator is an ideal location if you have space.
Many experienced gardeners successfully store seeds. If you’re uncertain about the quality of seeds you can test the germination rate before planting. Moisten a paper towel. Place 10 seeds on the paper towel and fold it over the seeds. Place in a plastic bag or container and seal it. The seeds need to remain moist. Label the bag with the type of seed and date. Place in a warm, 70oF location and check every few days. You should see signs of germination in 7-10 days. If you get 100% germination, plant as usual. If you get 70% to 90% go ahead and plant, but you may want to plant more heavily than usual. If fewer than 60% germinate, it is probably best to discard and start with new seeds. Low germination rates mean the seed viability is declining and any resulting seedlings will probably be weak.
I’m finding that collecting your own seeds, planting and watching them grow, and hopefully getting the desired delicious product is a fun process. I wish you success on your own journey on this fascinating and rewarding experience!
*VFN stands for Verticillium & Fusarium wilts, and Nematodes. Plants with this acronym have been bred to resist these problems.
**For more details about how to keep heirloom seeds “pure,” download our Seed Saving publication at https://ucanr.edu/sites/default/files/2011-06/111690.pdf or drop by our office and ask for a printed copy.
Barbara Kissinger Santos has been a UC Master Gardener in Stanislaus County since 2024
Resources
UC Master Gardeners of Santa Clara, Saving Seeds of Popular Plants - https://ucanr.edu/site/uc-master-gardeners-santa-clara-county/saving-seeds-popular-plants
UC Master Gardeners of Santa Clara, Seed Saving Basics - https://ucanr.edu/site/uc-master-gardeners-santa-clara-county/seed-saving-basics
Garden Notes – Saving Seeds - https://ucanr.edu/blog/garden-notes/article/saving-seeds
UC Master Gardeners of Sacramento County, Heirloom Tomatoes – https://ucanr.edu/site/uc-master-gardeners-sacramento-county/heirloom-tomatoes